
Perfect Presets for Ultrasounds
In an attempt to create less confusion about the knobology, ultrasound manufacturers have developed a concept called presets. Presets are a combination of pre, meaning before, and selected settings. The presets that are installed by the manufacturer are called factory presets. This is what you have when the machine comes out of the box. Before you begin a patient exam you select the transducer and the appropriate settings (preset). As the technology of ultrasound projects into the future, presets will become more important. Artificial Intelligence (AI) will play a significant role in how they are used.
The thing to keep in mind is that no two ultrasound manufacturers will image the same way no matter how close the presets are.
No two ultrasound probes will image exactly the same way either. The altitude of where the ultrasound system lives can also affect how the images appear as well. Of course the biggest variable is the size, shape, tissue density and hydration of the patients.
What can we do to provide the best ultrasound images?
The title of this article is a little tongue in cheek. Despite the lengths to which the manufacturers have gone to in order to perfect the presets, we can tell you that about 90 % of all machines we sell need some help in this area. Much of the applications and classes we offer deal with this very problem.
What do presets include?
They include many of the common imaging parameters. The list includes dynamic range, depth, focal zone, persistence, automatic gain control (ex. iTouch, auto and tissue equalization), compounding both spatial and frequency, Cine functions, line density, tint maps, middle frequency, measurements, annotations, settings for tissue border delineation, just to name a few. By selecting a preset you are also choosing the M-Mode, Doppler, color Doppler, access to continuous wave Doppler, 3D/4D and even elastography and contrast parameters. What each one of these items does and how it affects your image will be the subject of later articles. Each parameter can be changed independently within a preset to improve the images.
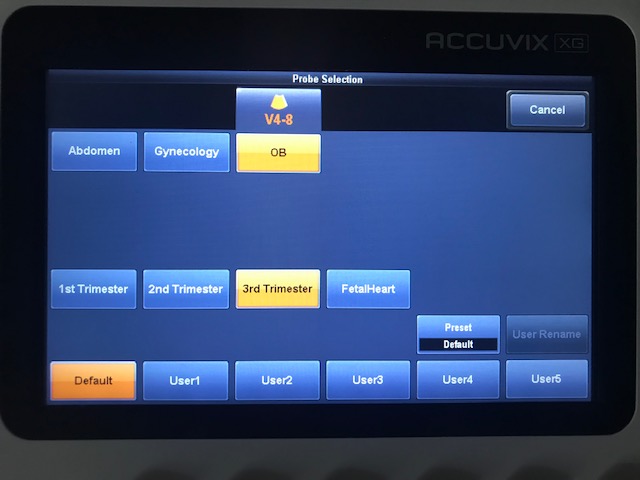
Samsung_Accuvix_presets
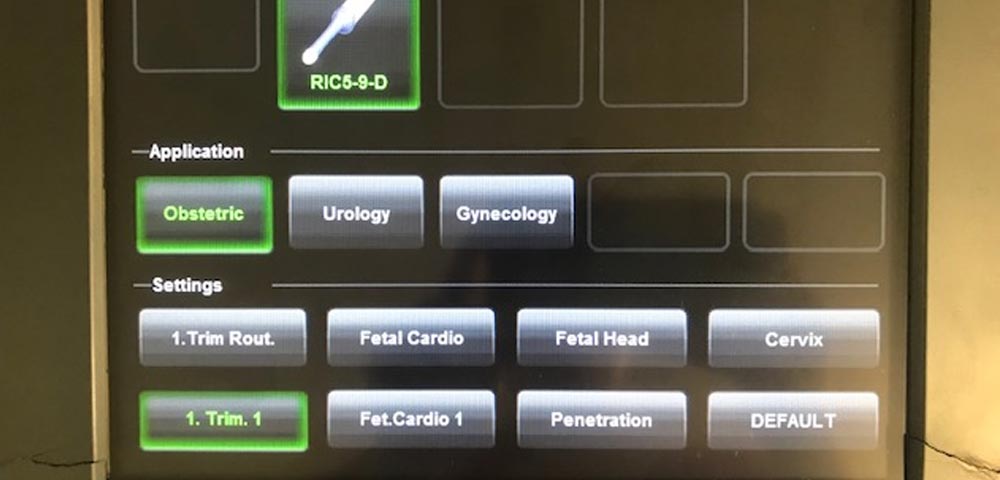
We have included the pictures of the presets on a Mindray M7, a GE Voluson E6 and a Samsung Accuvix XG. There is always a button on the user interface that is labeled either probe, exam or xducer. Press this button to see all the transducers that are plugged into the machine.
Then select the probe and select from the blocks or see the list below the icon of the transducer are the presets that probe will support.If you look at at the image of the GE system you will see that there are three selection areas. First select the transducer. Then choose the application which is the second row.
Then finally select the preset under settings. All three must be pushed for the machine to work properly. The most common mistake is to just select the probe and nothing else. When this happens the machine will default to the default setting. Then certain features may not work correctly. Then go back and do the selection process properly. This selection process is critical to the best image quality.
Notice that time gain compensation (TGC) or lateral gain compensation (LGC) are not mentioned in the list above. The TGC includes the side pods on the user interface. The lateral gain compensation adjustments are usually digital. The manufacturers assume that the slope will be middle positioned and changed with every image. We have tested this out in the lab many times and have never gotten the TGC to preset. There was only one instance where we got a LGC to preset.
The other function that you are locking in when you choose a preset is your reporting features. This does go hand in hand with the measurements that are joined to the preset. There are two types of measurements. The caliper measurements which are considered generic and will never go to a report and the preset exam measurements that will go to the report. Very few manufacturers offer a merge function in reporting. So if you want a gyn report then make sure you select a gyn preset to have the report populate correctly. There are times when you start an exam under one preset and due to other findings you need to modify how you complete an exam. One good example of this scenario is when you are doing an abdomen exam and you find out the reason the patient has nausea and pain is that she is pregnant. This is also assuming you are using the same probe for both types of exams. In this instance you need to complete the abdomen and save that report then change the preset to an obstetric selection take those images and save a separate report for ob. You cannot merge the two reports because the measurements are preset for the different exam types.
The other major factor in this equation is that even though you may have several machines they will still behave differently for the following reasons. Most institutions generally do not replace all their equipment at the same time. Therefore the older machines will have different software, hardware and REV numbers.
The question we get most often is why won’t the new machine look just like our old one?
This is the reason. Technology functions in generations. If there are six generations between the old machine and the new one, yes they will never image or behave the same way. This is a critical piece of information for functionality.
If you take a preset from a machine that is two years old and try to import that same preset into a machine that is three months old –again it may not work.
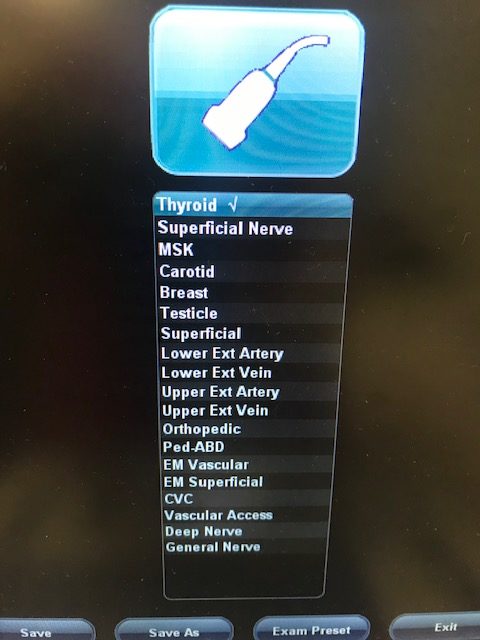
Mindray_7L_presets
The best outcome here is to customize the presets based on what the doctor’s preferences are for the images. Even in the situation where several machines are purchased at the same time the presets need to be the same software, hardware and REV level for any kind of uniform appearance of the images as well as functionality.
Even though the factory presets are not perfect they go a long way to cut down on the time to acquire each image. System optimization is an ongoing area of improvement. We spend a great deal of time with our customers to help them produce beautiful scans but also to be time effective.
PLEASE CALL 843-566-1020 for any question.